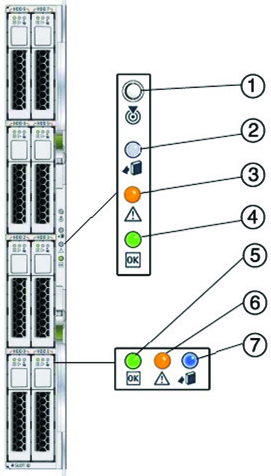
| Number |
LED Name |
Description |
| 1
|
Combined Locate button
and LED (white)
|
This LED helps identify which module you are working on
in a chassis full of servers.
-
Push and release this button to make the Locate LED
blink for 30 minutes.
- When the Locate LED is blinking, push and release this
button to make the Locate LED stop blinking.
- Hold down the button for 5 seconds to initiate a
push-to-test mode that illuminates all other LEDs for
15 seconds.
- This LED can also be made to blink from a remote
system using the CMM ILOM. Refer to the Sun Blade
Storage Module M2 Administration Guide for details.
|
| 2
|
Indicator not applicable
|
|
| 3
|
Module Fault LED (amber)
|
This LED has two states:
- On: An event has been acknowledged, and service
action is required. This could indicate a problem with
the module or a device inside the module (such as an
FMod or ESM).
- Off:Normal operation.
|
| 4
|
Module Status (green)
|
This LED has three states:
- On:Module is configured and online.
- Off:Module is not configured or is offline.
- Blinking:Module is configuring or a firmware flash
update is in progress.
|
| 5
|
Disk Drive Activity LED (green)
|
This LED has three states:
- On: Power is on and disk is online.
- Off: Disk is offline.
- Blinking: Irregular blinking means normal disk activity;
steady, slow blink means RAID activity (such as a
rebuild).
|
| 6
|
Disk Drive Fault and Locate LED
(amber)
|
This LED has four states:
- On: Disk fault. Service action required.
- Off:Normal operation.
- Slow blink: Disk failure predicted.
- Fast blink: Locate function activated.
|
| 7 |
Disk Drive Ready-to-Remove LED
(blue) |
This LED has two states:
- On: Ready to remove.
- Off:Normal operation.
|